
In this documentation, we are going to create an AWS Fargate Cluster for our Web Applications.
A few weeks ago I published an article Dockerize .NET Core and Deploy to AWS ECS Fargate with Gitlab CI you can follow this article as a next step.
The steps we will follow in this article,
- Create An ECR Repository
- Setting up IAM Credentials
- Create an AWS ECS Fargate Cluster
1. Creating an Elastic Container Registry (ECR) Application on ECS
First, we need to create a repository for ECS. If you have a repository to push images you can skip this step.
ECS > Amazon ECR > Repositories > Create repository.
Choose a repository name and click the “Create repository” button.
You will see a URL after creating the Repository. We will use it later for pushing our image to AWS ECR.
496150783845.dkr.ecr.eu-west-1.amazonaws.com/example
Now we have a docker repository to send images from the Gitlab-CI.
2. Setting Up IAM
2.1 Creating An IAM User For Deploy to ECS
We will create a “Programmatic Access” user to have a user key and token.
IAM > Add User
Username: ecs-deploy
Access type: Programmatic access

Next step we need to give the user in below permissions in “Attach existing policies directly” to deploy our ECS.
- AmazonECS_FullAccess
- AmazonECSTaskExecutionRolePolicy
- AmazonEC2ContainerRegistryFullAccess
- AmazonEC2ContainerServiceFullAccess
End of the creating user step review should be like image in below;

after creating the user, the “Access key ID” and the “Secret Access Key”, save those in your favourite text editor because we will need them for deploy our application. – I added the link end of the article –
2.2 Creating An IAM User For Deploy to ECS
IAM > Roles > Create Role
Or select a service to view it’s use cases: Elastic Container Service
Select your use case: Elastic Container Service Task
Next: Permissions
Filter policies: AmazonECSTaskExecutionRolePolicy

Next: Tags
Review:
Role name: ecsTaskExecutionRole
Create Role.
3. Creating An AWS ECS Fargate Cluster
ECS > Amazon ECS > Clusters > Create Cluster > Networking only
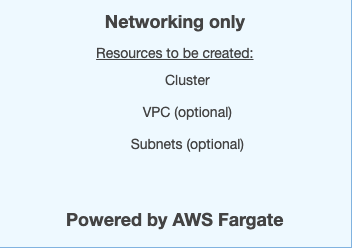
Choose a Cluster name and click the “Create” button.
4. Create Task Definition
ECS > Task Definitions > Create new Task Definition > Fargate
Task Definition Name: aws-ecs
Requires Compatibilities: FARGATE
Task Role: ecsTaskExecutionRole
Network Mode: awsvpc
Task execution role: ecsTaskExecutionRole
Task memory (GB): 0.5GB
Task CPU (vCPU): 0.25 vCPU
Container Definitions click to Add Container
Container name: aws-ecs
Image: enter the image URL in the 1st step
Port mappings: 80
End of the page click the Add button.
Click to Create.
Task definition status — 2 of 2 completed
if you don’t see that message check again the settings above.
4.1 Create Load Balancer
EC2 > Load Balancers > Create Load Balancer > Application Load Balancer
If you are planning to publish service on the internet you have to use internet-facing.
Selecting the internal Scheme you can only access the service internally.
Name: aws-ecs
Scheme: internet-facing
Load Balancer Protocol: HTTP
Load Balancer Port: 80
Availability Zones
Select your Public VPC and availability zones.
Next: Configure Security Settings
Next: Configure Security Groups
Create a new security group
Security group name: aws-ecs
Rule:


Next: Configure Routing
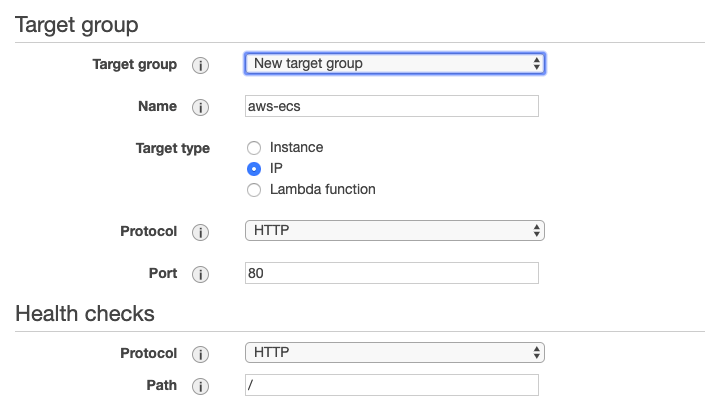
Next: Register Targets
Don’t add a target in this step click Review and Create the Load Balancer.
Choose your VPC and subnets for the load balancer and click Configure Security Settings.
4.2 Create Service
ECS > Clusters > Cluster-Name > Create (Under Services)
Launch type: Fargate
Task definition: aws-ecs
Platform: latest
Service name: aws-ecs
Number of tasks: 1
Minimum healthy percent: 100
Maximum percent: 200
Deployment type: Rolling update
Next Step
Cluster VPC: Choose your VPC
Subnets: Your subnets
Security groups: Select existing security group that we created in 4.1 Create Load Balancer step.
Auto-assign public IP: DISABLED
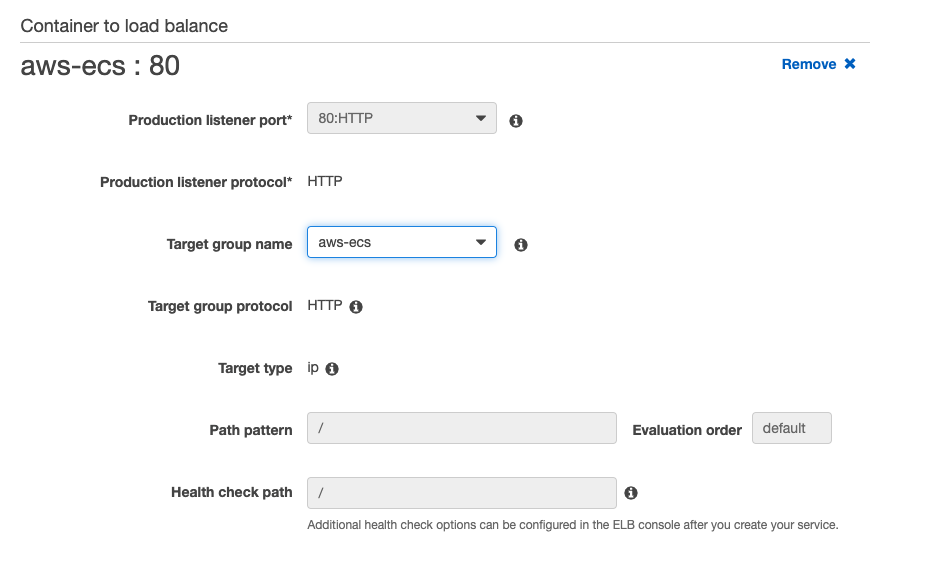
Load balancer type: Application Load Balancer
Load balancer name: aws-ecs
Container name: port click to Add to load balancer

Enable service discovery integration: uncheck
Next step
Service Auto Scaling: Do not adjust the service’s desired count
Next step
Review the configs and Create Service.
Now we have an AWS Fargate and ready to deploy for our docker services.
You can follow this article to Deploy Fargate with Gitlab CI
